


Implant Bits and Bites
- Michael Ling

- Nov 25, 2021
- 6 min read
ONE SENTENCE SUMMARY:
How to identify, sort, and stock the implant parts and supplies
BEST CASE SCENARIO IF WE ARE ALL 100% CONFIDENT:
Implant appointments are smooth and low stress. We are able to give our patients the best possible experience because we are well prepared and organized.
WORST CASE SCENARIO IF SOME OF US ARE NOT 100% CONFIDENT:
Implant appointments are chaotic and disorganized. Patients can sense that, and it adds even more stress to an already stressful visit. Some of the staff know what to do, but others don’t. The ones that do know are depended on to do more and more, which adds to their workload.
WHAT DOES “100% CONFIDENT” MEAN?
The doctor can ask for a part and you can bring it within 10 seconds if it’s on the tray, 30 seconds if it’s in the room, and 60 seconds if you have to leave the room to go get it.
If we were to dump out the content of any of the kits, you could reassemble it within 5 minutes. Use the photos in this guide if you have to!
Every time you set up for an implant appointment, you check the kits we are going to use and can identify any missing pieces.
If you were asked to check the implant stock, you could make a list of all the items that need to be re-ordered within 30 minutes. You also know how to place the order.
You can teach someone else how to do all of this to the same standard, either from memory or using these notes as a cheat sheet.
Below is a guide to our main implant kits and components.
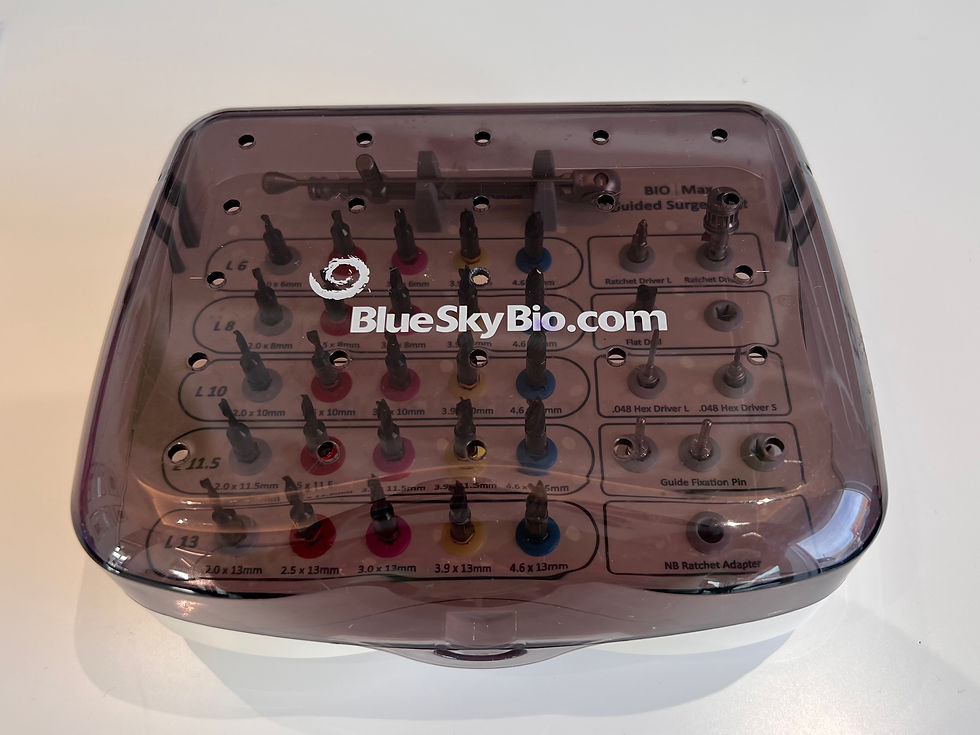
FULLY GUIDED KIT
This is our main surgical kit. We use this kit to place implants when using a surgical guide, which is most of the time.
Outside of the Fully Guided Kit

Inside of the Fully Guided Kit

Inside of the Fully Guided Kit with the parts labelled

Torque Wrenches. There are 2 different styles and both are fine.

Thumb Knobs. There are 2 different styles and both are fine.

Implant Drills. They are all labelled and colour coded so it’s easier to put them back in the right spot. The top one is 3.9 mm in diameter, and 8 mm in length. The bottom one is 4.6 mm in diameter and 13 mm in length.

Paralleling Pins. We sometimes take x-rays with these in the mouth to check positioning.

Implant Drivers. There is a long one and a short one. We use these to insert the implant, attached to either a Thumb Knob or Torque Wrench.

.048 Hex Drivers, Long and Short. .048 indicates the size, and they are labelled in tiny printing either on the shaft or the nub of the driver. This .048 size is compatible with Blue Sky Bio Biomax NP implants, which is what we place. Unfortunately, it is not always compatible with implants placed by other surgeons, so we have to use other drivers that are kept in the Prostho Kit.
---
BIOMAX KIT
We use this kit for placing implants when we are not using a surgical guide. We also use this kit for immediate implants, whether they are guided or not.

Outside of the Biomax Kit

Inside of the Biomax kit

Inside of the Biomax Kit with the parts labelled. The Torque Wrench, Thumb Knob, Hex Drivers, Implant Drivers, and Paralleling Pins are the same as in the Fully Guided Kit, so refer to those close-up photos above.

Implant Drills. They increase in size from left to right in the kit, and there is a Long and Short of each size. This one is 5.0 mm, Long on top and Short on bottom.

Lindemann Bur. This is a side cutting drill that is very useful for immediate implants.

Tissue Punch. This is used to create an opening through the gingiva before using the implant drills. Sometimes we use it. Other times we use the high speed. Other times we use 15 blade.
---
PROSTHO KIT
This kit is used whenever we are uncovering, taking impressions, or restoring implants. Basically every appointment that is not the implant placement surgery.
Outside of the Prostho Kit. It’s hard to read, but it is labelled on the outside.

Inside of the Prostho Kit

Inside of the Prostho Kit with the parts labelled. The Torque Wrench, Thumb Knob, and .048 Hex Drivers are the same as the other kits. See above for close-up photos.

.050 Hex Driver. In addition to the Long and Short .048 Hex Drivers, the Prostho Kit also has a Long .050 Hex Driver. This is used for Zimmer Internal Hex implants.

Scanpost Driver. This is used to insert the white scanposts for when we are taking an itero scan of an implant. You can tell the Scanpost Driver apart from the others because it has a very thin end.

Straumann Driver. This is used for Straumann implants. You can tell the Straumann Driver apart from the others because it has a crown shape at the end.

Angled Abutment Driver. This is used to insert angled abutments. You can tell the Angled Abutment Driver apart from the others because it has a ball shape at the end.
---
PROFILE KIT
We use this kit to reshape the bone that grows around implants. It’s good to have this kit handy at all implant surgeries and uncoveries.

Outside of the Profile Kit. It’s hard to read, but the outside of the kit is labelled.

Inside of the Profile Kit

Inside of the Profile Kit with the parts labelled. The .048 Hex Driver is the same as other kits. See above for close-up photos.

Profile Pins. These pins go into the implant, and then the Profile Drills fit over the pins.

Profile Drills. There are 4 of them, and they go small to large from left to right in the kit.
---
OTHER IMPLANT PARTS

Outside of the implant package. These are Blue Sky Bio brand. The model is Biomax NP. The top implant is 3.5 mm wide and 16 mm long. The bottom implant is 5.0 mm wide and 10 mm long.

Inside of the implant packaging. Each package comes with an implant and a purple cover screw.

Cover Screws and Healing Abutments. The difference is that Cover Screws get completely buried under the gums and are not visible in the mouth during healing. Healing Abutments are meant to be visible through the gums after they are placed and will remain visible during healing. The Cover Screws are very small and only come in one size. The Healing Abutments come in two different widths - smaller for anteriors and premolars, and larger for molars. And then each width comes in either tall or short heights.

Scanpost. We usually use a Scanpost to take an itero scan of single unit implants. For multiple units, we usually use impression copings and PVS impressions (see below). The Scanpost is purple and white, and has a label on it with the model number. This model IO 2B-A SA is specific to the type of implant we place (Biomax NP). If we are restoring a different type of implant, we will need a different Scanpost. Remember that the Scanpost Driver can be identified because it has a very thin end.

Open Tray Impression Coping. These come in Long and Short. This is a long one. The purple part goes over the implant, and the screw connects the purple to the implant. For these types of impressions, we need a plastic impression tray (custom or stock), with a hole cut in it for the end of the screw to poke through. We take the impression with heavy body putty and light body PVS.

Closed Tray Impression Coping. There are three parts - the purple impression coping, silver screw, and white plastic cap.

Closed Tray Impression Coping assembled. This is how it looks with all three pieces put together. For a closed tray impression, we need a stock or custom plastic tray, heavy body putty, and light body PVS. When we remove the impression from the mouth, the white cap will be stuck in the PVS and the purple part will stay connected to the implant via the screw. When do we do Closed Tray vs Open Tray? Sometimes one method is easier or more accurate than the other, depending on the situation. Ask the doctor which one they prefer.

Lab Analog. Whenever we take a PVS impression (not itero), we need to send one of these to the lab. The lab will use this analog to make the implant crown. If we do not send one, the lab can provide one but it is much more expensive. These analogs are specific to the implant being placed, so this one is compatible with our implants (Biomax NP).
---
ORDERING LIST
Click below to download a PDF that can be printed

WHAT IF:
1. We run low on stock.
Certain items can be purchased from Abutment Direct, which is located in Canada. These can be ordered any time. There is no bulk discount.
Other items must be purchased from Blue Sky Bio, which is located in the USA. If we have items delivered across the border, there are often delays in shipping and also extra taxes to pay. So if you need to place a BSB order, we usually try to ship it to a hotel in the USA if any of the doctors are travelling there soon.
If you are making a BSB order, it is ideal to restock both Ancaster and Dundas at the same time.
*If you order from BSB, make sure we get our discount for being members of Dental Whale.
2. We run out of something and need it urgently.
Ask the doctor. Sometimes we can “fudge it” and use a different part. Other times if we really need a part urgently we can order it from another source, even if it costs more.
3. You can’t identify certain parts.
Check the photos of the parts and kits in this guide. If you still can’t identify the parts, ask Mike. That also means that we need to take more or better photos so the next time it happens we can use this guide.

Comments